Have a Question?
-
Accounting Codes/Leave
-
Accounting/Admin Role
-
Accounting/Codes
-
Accounting/Leave Request
-
Announcements
-
Custom
-
Custom
-
Dashboard
-
Employee Role Related
-
Employees
-
Export
-
Exporting Data
-
Frequently Asked Questions
-
General Setup Instructions
- Billable vs Non Billable
- Creating Groups
- Employee Authorized Charge Code Associations
- Manage Charge Codes (Non QuickBooks)
- Manage Charge Codes (QuickBooks)
- New Site Setup Steps
- Overtime Rules
- Setting up and Defining System Roles
- Setting up leave in Hour Timesheet
- Setup Guide For Stand Alone Accounts
- Smart Phone App
- Step 1. Setup Leave Types
-
Groups
-
Importing Data
-
Misc
-
Mobile App
-
My Timesheet
-
Options to Capture Employee Time
-
Payroll
-
QuickBooks Desktop
-
QuickBooks Desktop
-
QuickBooks Desktop
-
QuickBooks Online
-
QuickBooks Online
-
QuickBooks Online
-
Reports
-
Reports
-
Request Leave
-
Run Payroll
-
Run Payroll
-
Schedule
-
Schedules
-
Settings Menu
-
Supervisor Reports
-
Timesheet Review
-
Timesheet Review
< All Topics
Print
Employee Role – Viewing Leave Balance
Posted
Updated
Byhourtimesheet
Viewing Employee Leave Balance Data
1. Login to Hour Timesheet
2. Navigate to My Timesheet menu
3. Click the Leave Balance tab (see screenshot)

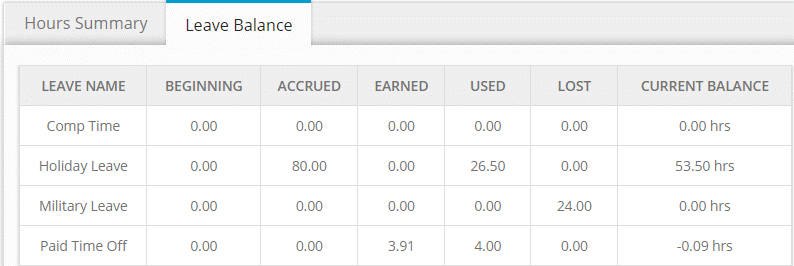
Additional leave balance notes
Balance is reduced after timesheet is submitted at the end of each timesheet period.
User may be allowed to “go into the negative” if feature is configured.
System will stop accruing leave once limit “ceiling” is reached. Additional leave earned or accrued after leave ceiling is reached is moved to the “lost” column.
Request Leave
1. Navigate to Request Leave menu
2. Click Create New Leave Request
3. Complete the form
4. Click OK

Table of Contents