-
Accounting Codes/Leave
-
Accounting/Admin Role
-
Accounting/Codes
-
Accounting/Leave Request
-
Announcements
-
Custom
-
Custom
-
Dashboard
-
Employee Role Related
-
Employees
-
Export
-
Exporting Data
-
Frequently Asked Questions
-
General Setup Instructions
- Billable vs Non Billable
- Creating Groups
- Employee Authorized Charge Code Associations
- Manage Charge Codes (Non QuickBooks)
- Manage Charge Codes (QuickBooks)
- New Site Setup Steps
- Overtime Rules
- Setting up and Defining System Roles
- Setting up leave in Hour Timesheet
- Setup Guide For Stand Alone Accounts
- Smart Phone App
- Step 1. Setup Leave Types
-
Groups
-
Importing Data
-
Misc
-
Mobile App
-
My Timesheet
-
Options to Capture Employee Time
-
Payroll
-
QuickBooks Desktop
-
QuickBooks Desktop
-
QuickBooks Desktop
-
QuickBooks Online
-
QuickBooks Online
-
QuickBooks Online
-
Reports
-
Reports
-
Request Leave
-
Run Payroll
-
Run Payroll
-
Schedule
-
Schedules
-
Settings Menu
-
Supervisor Reports
-
Timesheet Review
-
Timesheet Review
Step 3. Assign Leave to Employee
Each employee must be linked to the appropriate leave options defined by your organization. Hour Timesheet allows administrators to assign specific Leave Types and Leave Policies based on job roles, eligibility criteria, or individual agreements.
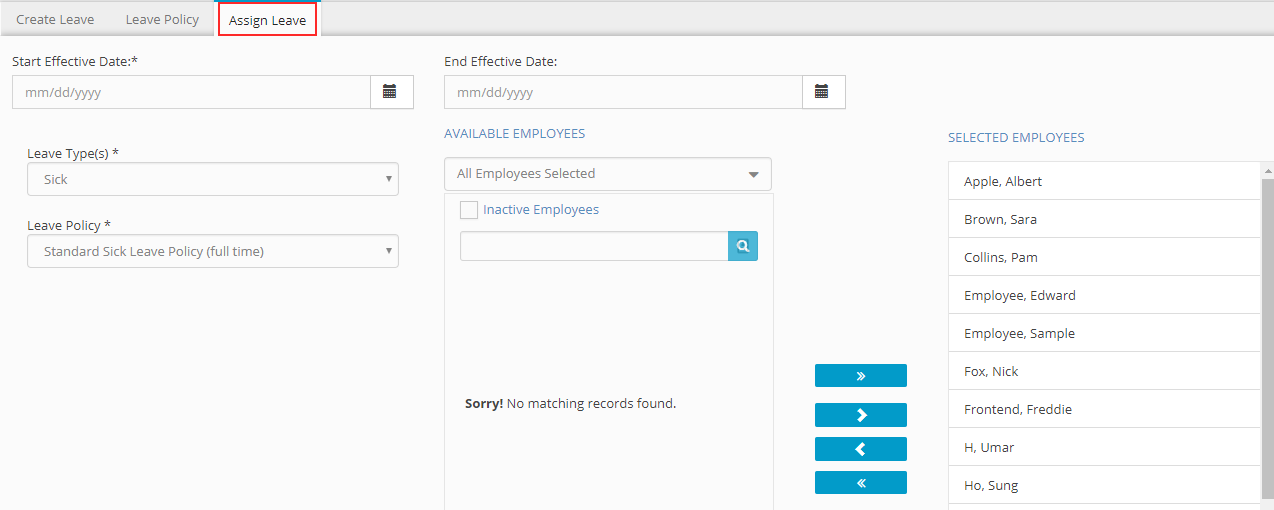
Assign Leave to Employee(s)
To assign Leave Types to an Employee:
1. Login to Hour Timesheet as Admin or Accountant
2. Navigate to Accounting→ Leave sub menu
3. Select Assign Leave tab.
4. Click the calendar icon box to select a Start Effective Date and End Effective Date (optional)
5. Select a Leave Type from Leave Types selection box.
6. Select a Leave Policy from Select Leave Policy selection box.
7. Select from the Available Employees from Available Employees selection box.
8. Click the > to move the selected leave from above to the Selected Leaves list box
9. Click the Assign button to complete.
10. Repeat steps 1-9 above for each leave type.

-> Next step in leave setup process (adjust employee leave balances)