Have a Question?
-
Accounting Codes/Leave
-
Accounting/Admin Role
-
Accounting/Codes
-
Accounting/Leave Request
-
Announcements
-
Custom
-
Custom
-
Dashboard
-
Employee Role Related
-
Employees
-
Export
-
Exporting Data
-
Frequently Asked Questions
-
General Setup Instructions
- Billable vs Non Billable
- Creating Groups
- Employee Authorized Charge Code Associations
- Manage Charge Codes (Non QuickBooks)
- Manage Charge Codes (QuickBooks)
- New Site Setup Steps
- Overtime Rules
- Setting up and Defining System Roles
- Setting up leave in Hour Timesheet
- Setup Guide For Stand Alone Accounts
- Smart Phone App
- Step 1. Setup Leave Types
-
Groups
-
Importing Data
-
Misc
-
Mobile App
-
My Timesheet
-
Options to Capture Employee Time
-
Payroll
-
QuickBooks Desktop
-
QuickBooks Desktop
-
QuickBooks Desktop
-
QuickBooks Online
-
QuickBooks Online
-
QuickBooks Online
-
Reports
-
Reports
-
Request Leave
-
Run Payroll
-
Run Payroll
-
Schedule
-
Schedules
-
Settings Menu
-
Supervisor Reports
-
Timesheet Review
-
Timesheet Review
< All Topics
Print
Step 4. Leave Balance Adjustments
Posted
Updated
ByDebbie Sabin
Manual Leave Balance Adjustments for Employees
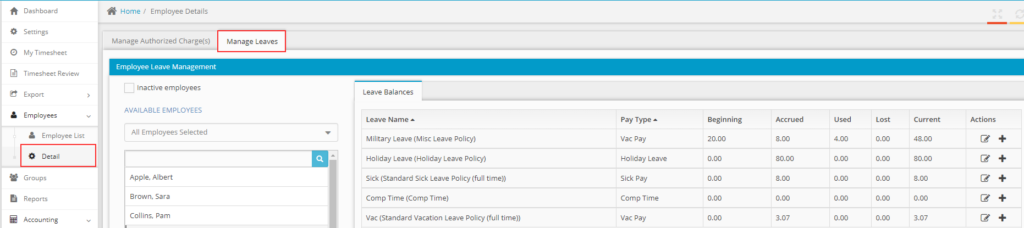
Employee leave balances may be manually adjusted. Leave may be viewed by users with the Supervisor, Accounting or Admin role. Leave may be adjusted by users with the Accounting or Admin role.
1. Login to Hour Timesheet as Admin or Accountant
2. Navigate to Employee→ Detail sub menu
3. Select Manage Leaves tab
4. Select the employee from the Available Employees list
5. Click the icon to edit the balances
6. Adjust the required data
7. Click Ok

Table of Contents